
.png)
Over the last couple of weeks, we have written about different ways of using Viam, and how to extend and integrate it with technologies such as ROS. We have also looked into software deployment through Viam’s Modular Registry and how convenient this can be. In this blog post, I want to focus on another aspect: continuous integration (CI) as part of CI/CD (continuous deployment).
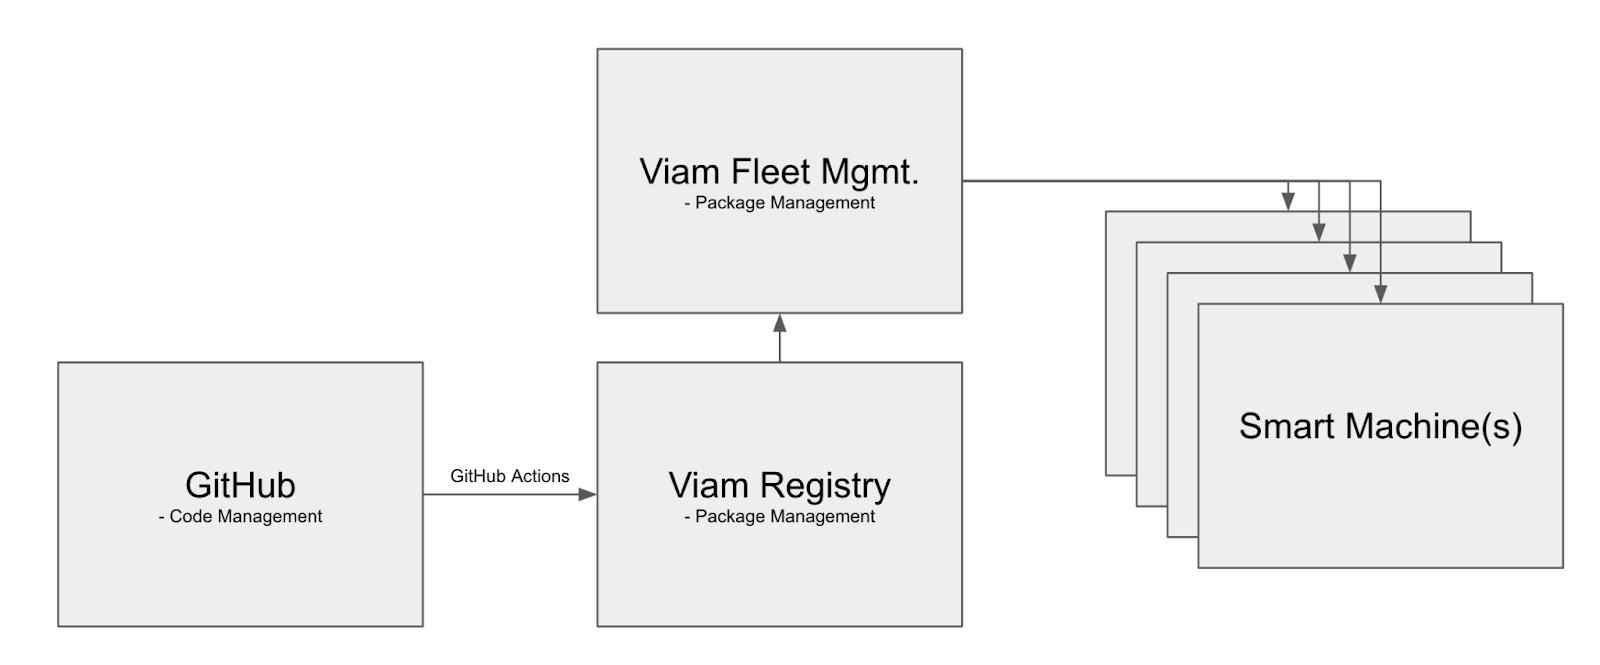
Most software developers these days use platforms like GitHub to store and manage their code base, and leverage it as part of their CI/CD process. Wouldn’t it be great if you could use a similar seamless experience with the Viam cloud platform, and make new functionality available to your smart machines without any additional effort? Well now you can. Let me briefly share how it works.
Viam recently released its Modular Registry, which is a package management system for Viam modular resources. You can think of it as the “npm” for smart machines and robots.
Within the realm of Viam, pieces of hardware are represented as components, software functionality is represented as services, and both are bundled into modules. These so-called modular resources will allow any type of hardware or software service to be easily integrated with Viam and expose their functionality via Viam’s standardized API over gRPC/WebRTC. Thanks to the standardized API, you will then be able to replace hardware components through simple configuration without having to touch your higher level application logic. Haven’t decided which device to use yet? No problem, just plug them in and run your tests.
Since different hardware modules will require different software packages - or as we call them, modules - you will need a centralized location to store them. The Viam Modular Registry fulfills exactly that purpose, and more components and services are added every day. Once you configure such a component on your machine, the Viam RDK will then automatically download and install the required modules on the machine with the version you chose. You can also easily upgrade, downgrade, or remove modules fully automated. In that way, the Viam RDK and Viam Registry together basically solve the CD aspect of CI/CD.
However, there is a gap between software development and releasing modules in the registry, and for this purpose GitHub provides a capability called GitHub Actions. As the name suggests, this capability allows you to execute and automate actions; for example, automatically building and uploading Viam packages as modules into the Viam registry, as illustrated in the image below.
To organize this CI/CD process through Viam, we must first ensure that the Modular Registry is set up to store our modules.
Preparing the Viam Registry (one-time configuration)
The first thing you have to do is to create a namespace within app.viam.com. The namespace must be unique to avoid overlap with other modules or namespaces. Within your namespace, you will then be able to create as many modules as you like.
Assuming you have developed a Viam modular resource already, you will then have to create a little bit of metadata for your module. This can easily be done using the Viam CLI as instructed here from within your module root folder.
(A note on all the code snippets below: click once on each image to its activate color-coding).
Command:
This command will create a meta.json file, which you will then have to update with the settings of your choice.
Please make sure that this file is then uploaded to your Github repository. We are now ready to start configuring the GitHub Action.
Configuring the GitHub action
GitHub Actions provide powerful functionality within the GitHub space, while also opening up a vast variety of possibilities and complexity. But don’t worry, with Viam you don’t need to build GitHub Actions from scratch! Viam already has a pre-built template. All you have to do is copy and paste it, and then modify the places marked in red below towards your specific needs.
Now that we have tailored the GitHub Action to our liking, we need to upload the module to the Viam registry according to the steps below.
1. Build command
This command, as the name says, builds your package or module. As such, it depends on what programming language you chose to build the module.
You can find more examples on the Viam Upload Module repo.
2. Enable upload action
While you are configuring and testing your build commands, you don’t necessarily want to upload a package into the Viam Module Registry. Therefore, keep this commented until you are ready to publish your module.
3. Viam organization ID
The Viam Module Registry allows you to upload your modules into a private space, or into the public space where anyone will be able to use it. You can easily find your organization under the settings within app.viam.com.
4. Target architecture
Different modules may require or only work on specific platforms. You can also build for multiple platforms within one GitHub Action, as shown in the image below:
5. Versioning
While you can change the pattern of this important setting towards your needs, the default setting is applicable to most scenarios, and limiting unnecessary changes here can help avoid problems and confusion down the line. For example, you could publish development branches on push and official releases on release with different versioning patterns, as shown on the example below:
%2520(2).png)
We are almost done! All we have to do now is to add credentials, which will allow the GitHub Action to access the Viam Registry.
6. Adding Viam Registry credentials
The last thing we have to do is to create access credentials with the Viam cli. These credentials will be used by the GitHub Action for authentication of the Viam Registry.
All you have to do is run the command shown below, and then specify your organization ID and a meaningful key-name, and you will receive the credentials.
If you don’t know your organization ID, you can find it in the web interface under your organization’s settings or directly via the CLI.
The received credentials now need to be added to your GitHub repository under your repos settings section. You should be able to find an option called “Secrets and Variables” / “Actions” where you can add the key and the secret, and then it should be all set.

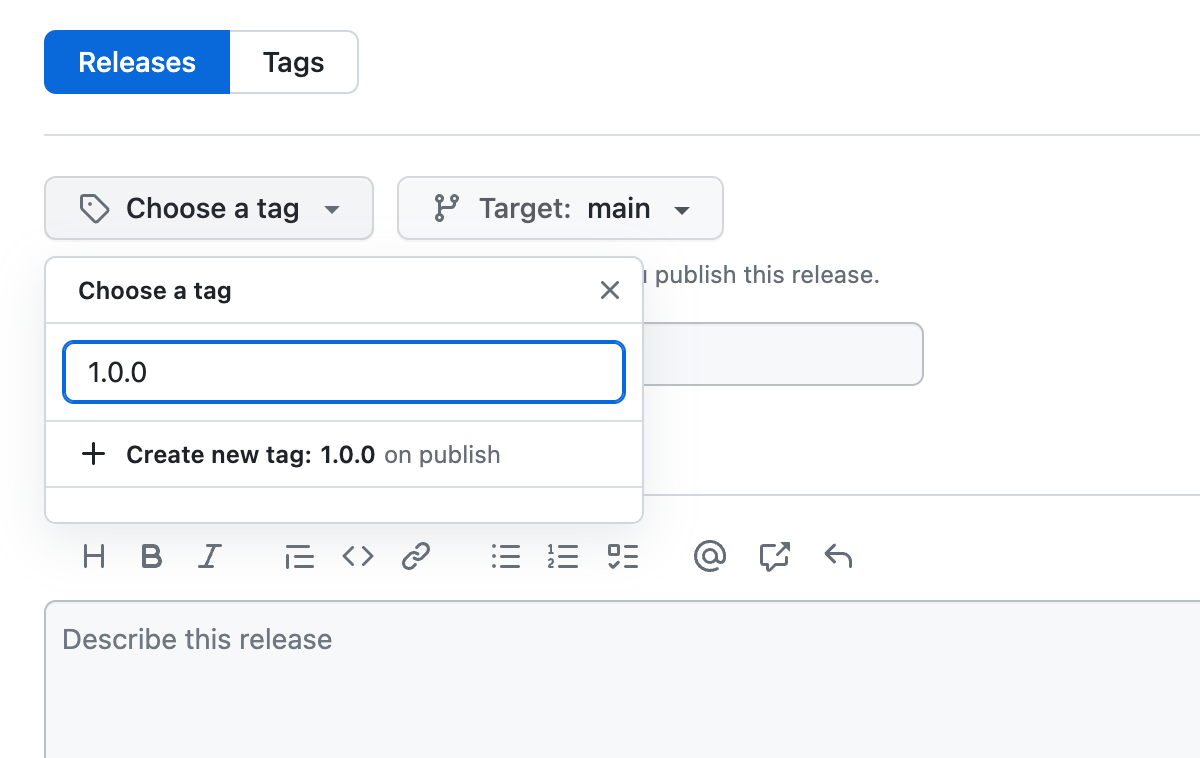
Creating a release
Time to test it all out! Creating a release in GitHub is straightforward. While you can create a release via command line, I chose the UI path. You can find the “Release” button on the right in your GitHub repository. While you can and should add some meaningful information to your release, all you need to make the Viam registry integration work is a version tag.
Once the release is completed, the GitHub Action will automatically run and publish the module, including its version, to the Viam Registry, from which it then can be deployed.
Deploying an uploaded module
Once modules are published to the Viam Registry, it becomes very easy to deploy them onto your smart machine. I used our imagefilter component as an example shown on the screenshots below. Just search for your component in your “Create component” menu, fill in the name for the component, and it will automatically get installed on your smart machine once it is online.
.png)
The installation process includes adding the module of which the chosen resource is a part. You can find it under the “Modules” tab, as shown below. There is also a menu which allows you to change the version up or down, depending on your needs.

I hope you have enjoyed reading this article and gotten curious about the functionality we provide. Stay tuned, since this is just the first release of this capability, and we have a lot more coming soon!
As usual, if you have any questions please don’t hesitate to reach out! We are definitely friendly people and look forward to talking to you.
