Ready to add some machine learning (ML) to your space? In this tutorial, we’ll show you how to use Viam's computer vision service and your computer’s built-in webcam for object detection when someone (aka you!) sits down at the desk—and automatically turns on a lamp.
But why stop there? You could turn this into a cozy night light for reading, a security system that alerts you when someone’s nearby, or even a bathroom light that only switches on when needed. The possibilities are endless!
This project is a perfect jumping-off point if you're new to building robots. Plus, you don’t need much hardware—just your computer and a smart plug. Let’s dive in!
What you’ll need
Hardware requirements
To start building, you’ll need:
A computer with a webcam: While this tutorial uses a MacBook Pro, any computer running macOS or 64-bit Linux will work. To explore other cameras used for object detection, head to our guide on object detection sensors.
Viam Python SDK: This software development kit (SDK) lets you control your Viam-powered robot by writing custom scripts in the Python programming language. Install the Viam Python SDK by following these instructions.
With the hardware and software in place, you’re now ready to start the project.
1. Connect to your machine with viam-server
Open the Viam app, add a new machine, and follow the step-by-step instructions to install viam-server on your computer. Once that’s done, you’ll be ready to configure your device.
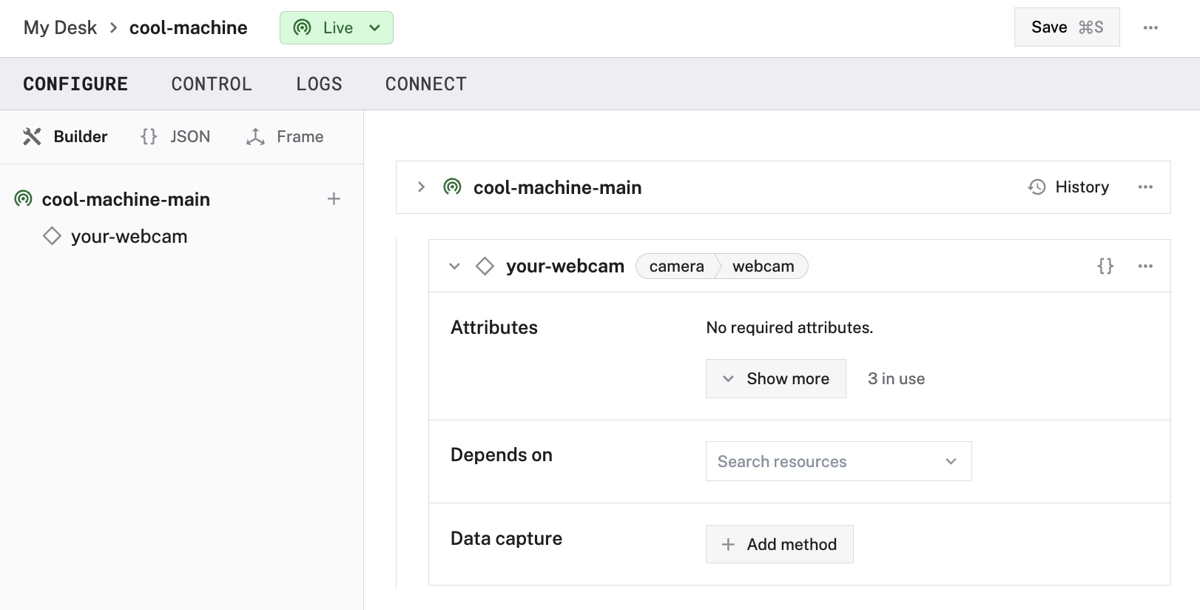
2. Configure your object detection camera
The webcam being configured for this object detection tutorial within Viam's app.
Add the component to your machine
Configure your webcam so that your machine can get the video stream from your camera:
On the Viam app, navigate to your machine’s page. Check that the part status dropdown in the upper left of the page, next to your machine’s name, reads “Live”; this indicates that your machine is turned on and that its instance of viam-server is in contact with the Viam app.
Click the + (Create) button next to your main part in the left-hand menu and select Component. Start typing “webcam” and select camera / webcam. Give your camera a name. This tutorial uses the name cam in all example code. Click Create.
Click the video path dropdown and select the webcam you’d like to use for this project from the list of suggestions.
Click Save in the top right corner of the screen to save your changes.
Test your physical camera
To test your camera, go to the CONTROL tab and click to expand your camera’s panel.
Toggle View cam to the "on" position. The video feed should display. If it doesn’t, double-check that your config is saved correctly, and check the LOGS tab for errors.
Within the Viam app's "control" tab, you can test if your camera is working correctly.
Want to bring this project to a classroom or club? Explore Viam for Educators for resources to help teach the workshop.
Now that you know the camera is properly connected to your machine, it is time to add computer vision by configuring the vision service on your machine.
This tutorial uses a pre-trained ML model from the Viam Registry called EfficientDet-COCO. The model can detect a variety of things, including people. You can see a full list of what the model can detect in labels.txt file. If you want to train your own model instead, follow the instructions in train a model.
Set up the object detection model
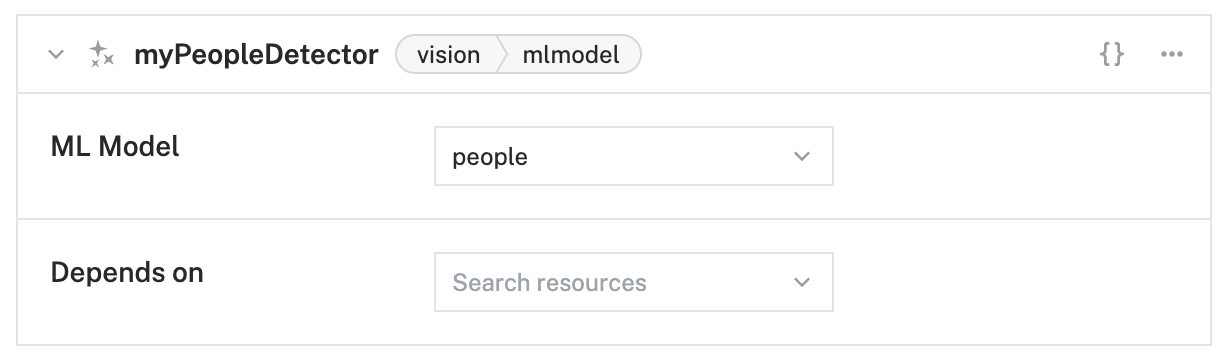
1. Configure the ML model service
Navigate to your machine’s “Configure” tab.
Click the + (Create) button next to your main part in the left-hand menu and select Service. Start typing ML model and select ML model / TFLite CPU from the builtin options.
Enter people as the name, then click Create.
In the new ML Model service panel, configure your service.
The ML model service being deployed onto my smart machine within the Viam app.
Select Deploy model on machine for the Deployment field. Then select the viam-labs:EfficientDet-COCO model from the Models dropdown.
Click the + (Create) button next to your main part in the left-hand menu and select Service. Start typing ML model and select vision / ML model from the builtin options.
Enter myPeopleDetector as the name, then click Create.
In the new vision service panel, configure your service.
Select people from the ML Model dropdown.
The object detection model being deployed onto the smart machine within the Viam app interface.
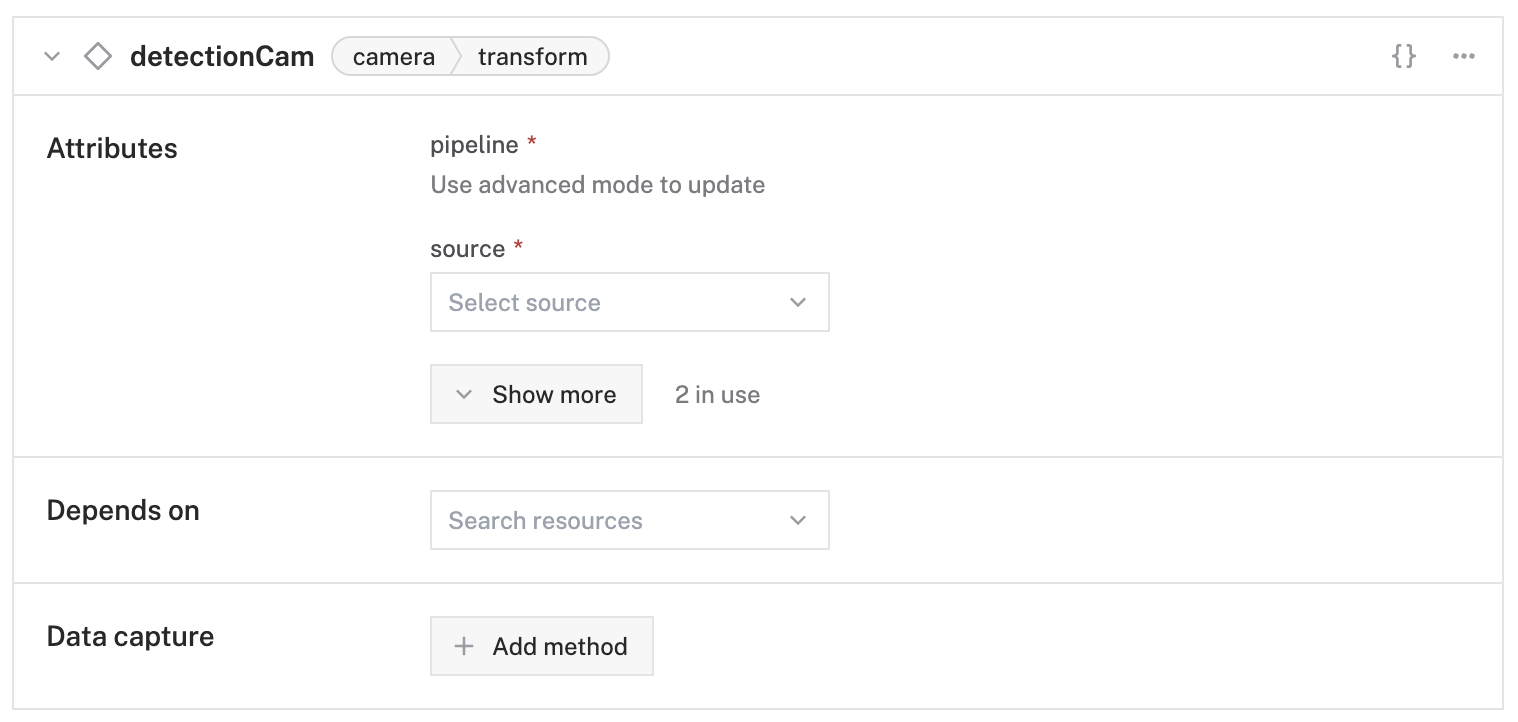
Check that the object detection is working
To be able to test that the vision service is working, add a transform camera which will add bounding boxes and labels around the objects the service detects.
Click the + (Create) button next to your main part in the left-hand menu and select Component. Start typing “webcam” and select camera / transform. Give your transform camera the name detectionCam and click Create.
The transform camera, "detectionCam," for object detection being deployed on the device.
In the new transform camera panel, click on {} to go to advanced mode and replace the attributes JSON object with the following object which specifies the camera source that the transform camera will use, and defines a pipeline that adds the defined myPeopleDetector:
Showing the "transform camera" panel in JSON mode within the Viam app interface.
4. Set up the Kasa smart plug
Plug your smart plug into any power outlet and turn it on by pressing the white button on the smart plug. To connect the plug to your wifi, download the Kasa Smart app from the App Store or Google Play to your mobile phone. When you first open the app, you will be prompted to create an account. As you do this, you will receive an email with the subject line “TP-Link ID: Activation Required” to complete your account registration.
Follow the steps in Kasa’s setup guide to add your device and connect it to your wifi. Once it is connected, you will no longer need to use the mobile app.
Open a terminal on your computer and run the following command to install the smart plug Python API:
pip3 install python-kasa
Run the following command to return information about your smart device:
kasa discover
You should see this command output something like this:
The terminal showing a command output when installing the smart plug Python API.
Write down or save the host address (for example, 10.1.11.221). You will need to include it in your Python code in a later step.
5. Write Python code to control your object detection robot
Now that you have your machine configured and your Kasa plug set up, you are ready to set up the code for the logic of the robot. The files used in this section can all be found in the GitHub repo for this project.
Create the main script file
On your computer, navigate to the directory where you want to put the code for this project.
Create a file there called lightupbot.py. This will be the main script for the machine.
Copy the entirety of this file and paste it into your lightupbot.py file.
Save lightupbot.py.
Connect the Python code to the robot
You need to tell the code how to access your specific robot (which in this case represents your computer and its webcam).
Navigate to the “Connect”CONNECT tab on the Viam app. Make sure Python is selected in the Language selector.
Get the robot address and API key from the code sample and set them as environment variables or add them at the top of lightupbot.py. API KEY AND API KEY ID: By default, the sample code does not include your machine API key and API key ID. We strongly recommend that you add your API key and API key ID as an environment variable and import this variable into your development environment as needed. To show your machine’s API key and API key ID in the sample code, toggle Include secret on the CONNECT tab’s Code sample page.
CAUTION: Do not share your API key or machine address publicly. Sharing this information could compromise your system security by allowing unauthorized access to your machine, or to the computer running your machine.
You also need to tell the code how to access your smart plug. Add the host address (for example, 10.1.11.221) of your smart plug that you found in the kasa discover step to line 55 of lightupbot.py.
Run the Python code
Now you're ready to test your robot!
From a command line on your computer, navigate to the project directory and run the code with this command:
python3 lightupbot.py
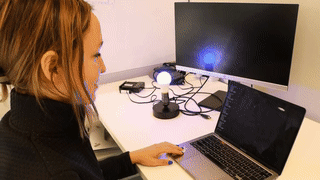
If the camera detects a person, it will print to the terminal “This is a person!” and turn on the smart plug. If it does not find a person, it will write “There’s nobody here” and will turn off the plug.
Try moving in and out of your webcam’s field of view. You will see your light turn on and off as the robot detects you!
Your terminal output should look like this as your project runs:
python3 lightupbot.py
This is a person!
turning on
There's nobody here
turning off
You can actually detect any object that is listed in the labels.txt (such as a dog or a chair) but for this tutorial, we are detecting a person.
To detect something else with the camera, just change the string “person” on line 46 of lightupbot.py to a different item in the label.txt file.
if d.class_name.lower() == "person":
    print("This is a person!")
    found = True
Try one of our other object detection tutorials
The light automatically turning on when a person is detected in front of the webcam.
In this tutorial, you built an object detection robot that turns on your lights using Viam. But why stop there? Use this same idea to activate a pet feeder when your cat looks at the camera, set up a security system that alerts you when someone’s detected, or even create a hydroponic garden that monitors the health of your plants and herbs.
Ready for more robotics projects? Explore our other tutorials, or join us on Community Discord—we’re always here to help!
Find us at our next event
Error! No upcoming events found. Please check back later!